OpenCV で画像のサイズを変更するには、 cv2.resize(元画像, dsize=(幅, 高さ)) とすれば良い。連結するには、 cv2.vconcat() と cv2.hconcat() を使うが、 concat_tile 関数を定義して、画像の2次元リストを渡して処理をした。
ちなみに画像のトリミングは、 img[ymin:ymax, xmin:xmax] と、OpenCV を使わずにできる。
作成した動画
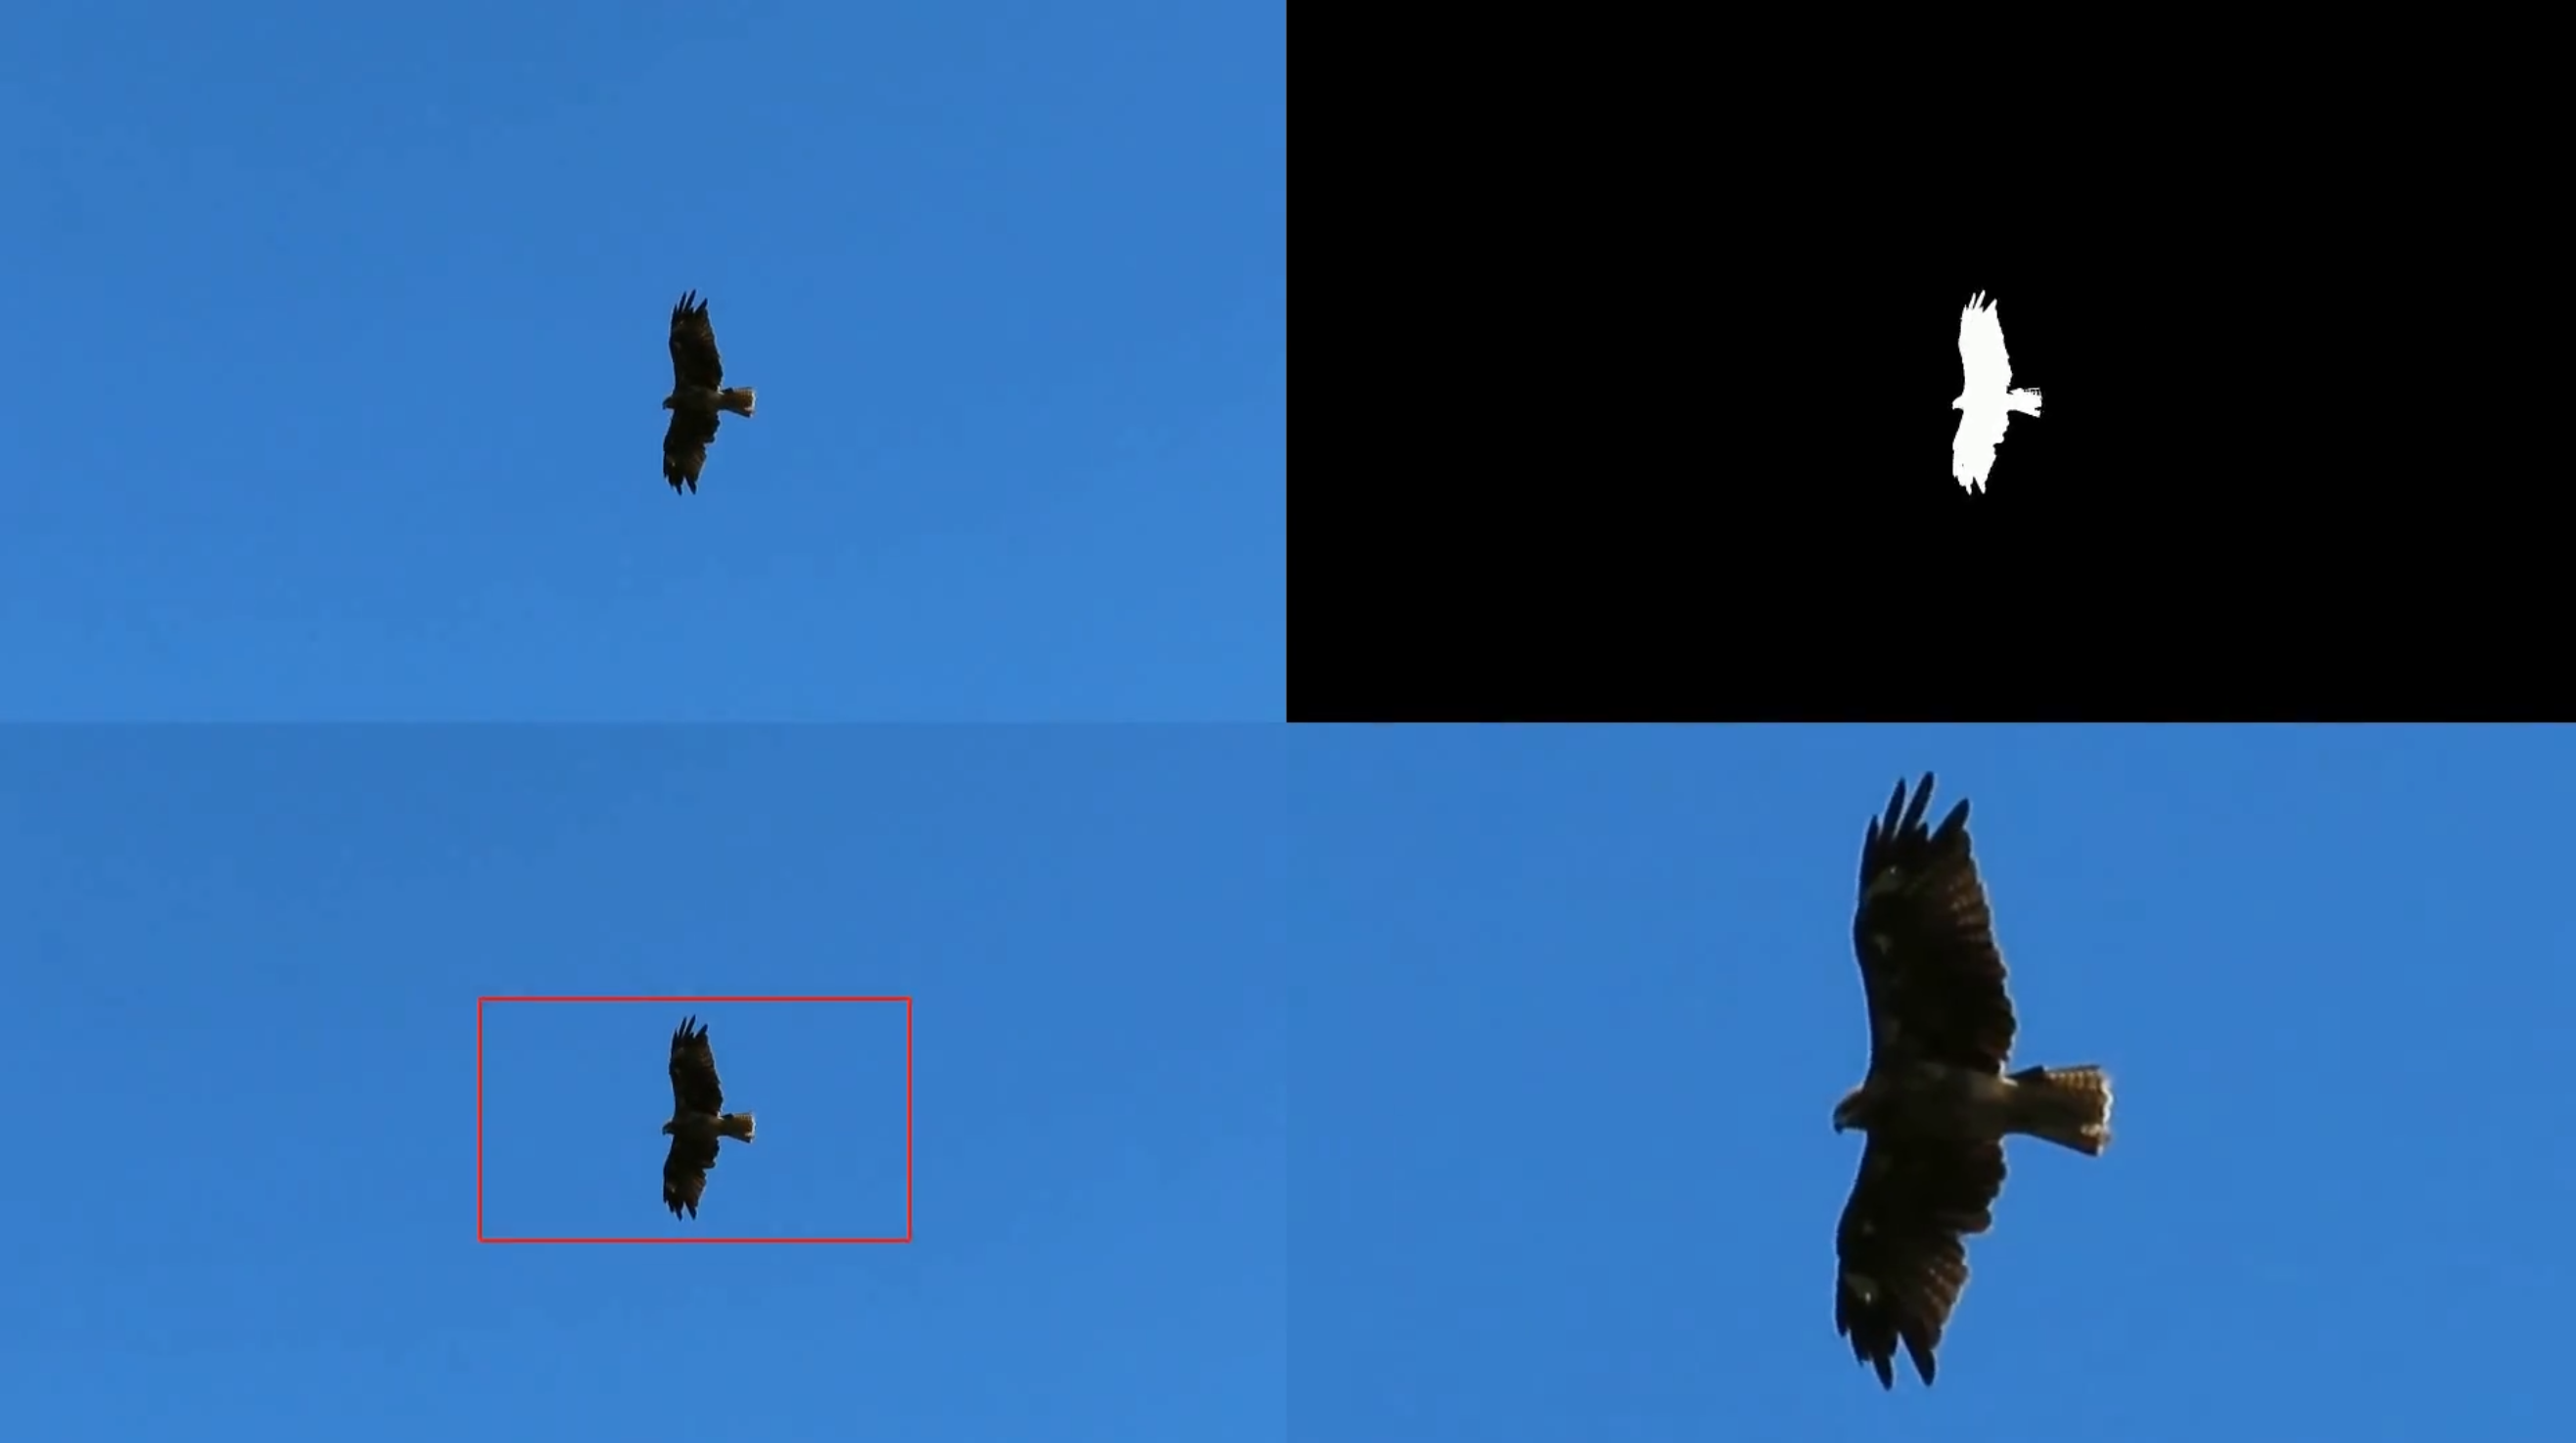
今回、トビを追尾し拡大する過程(トビを判定するマスクを作成し、重心を算出、切り取り)を1画面に連結した。左上が元画像。右上がターゲットの重心算出用のマスク画像。左下が拡大範囲。右下が拡大画像。
cv2.resize でサイズを整え、concat_tile 関数を定義して連結した。
コード
import cv2
import sys
import numpy as np
import moviepy.editor as mp

# 画像を加工する
def mkimg(img):
    # トリミング画像を作る

    # マスクから、目標画像の中心(x, y)を算出
    mask, maskGray = mkmask(img,0,255,0,255,0,100)
    mu = cv2.moments(maskGray,False)
    x, y= int(mu["m10"]/mu["m00"]) , int(mu["m01"]/mu["m00"])

    # トリミングの範囲を作る
    trim_width = int(width / 3)
    trim_height = int(height / 3)

    # 左上の座標 重心からのズレを設定
    xmin, ymin = x - int(trim_width/2), y - int(trim_height/2)

    # トリミングの範囲が画像外にならないように調整
    xmin, ymin = min(max(0, xmin), width - trim_width), min(max(0, ymin), height - trim_height)

    # 右下を設定し、トリミング後の画像を作成
    xmax, ymax = xmin + trim_width, ymin + trim_height
    trim_img = img[ymin:ymax, xmin:xmax]

    # レクタングルつき画像を作成
    img_rec = img.copy()
    cv2.rectangle(img_rec, (xmin, ymin),(xmax, ymax),(0, 0, 255),3)

    # 作成過程の画像をそれぞれリサイズする
    hwidth = int(width/2)
    hheight = int(height/2)
    img_r1c1 = cv2.resize(img, dsize=(hwidth, hheight))
    img_r1c2 = cv2.resize(mask, dsize=(hwidth, hheight))
    img_r2c1 = cv2.resize(img_rec, dsize=(hwidth, hheight))
    img_r2c2 = cv2.resize(trim_img, dsize=(hwidth, hheight))

    # 画像を連結
    img_tile = concat_tile([[img_r1c1, img_r1c2],
                            [img_r2c1, img_r2c2]])
    return img_tile

# cv2.vconcat()とcv2.hconcat()を組み合わせて、画像を縦・横にタイル状に連結
# https://note.nkmk.me/python-opencv-hconcat-vconcat-np-tile/
def concat_tile(im_list_2d):
    return cv2.vconcat([cv2.hconcat(im_list_h) for im_list_h in im_list_2d])

# HSV情報からmaskを作成
def mkmask(img,hmin,hmax,smin,smax,vmin,vmax):
    h,s,v = np.float32(cv2.split(cv2.cvtColor(img,cv2.COLOR_BGR2HSV)))  # 色空間をBGRからHSVに変換
    mask = (cv2.inRange(h,hmin,hmax)/255) \
         * (cv2.inRange(s,smin,smax)/255) \
         *  cv2.inRange(v,vmin,vmax)
    return cv2.cvtColor(ct(mask), cv2.COLOR_GRAY2BGR), mask

# 値を0-255にclipして、typeをuint8にする
def ct(img):
    return np.clip(img,0,255).astype(np.uint8)

# 動画関連 -------------------------------------------------------------
def set_audio(srcfile,imgfile,outfile):
    # Extract audio from input video.
    clip_input = mp.VideoFileClip(srcfile)
    clip_input.audio.write_audiofile('audio.mp3')
    # Add audio to output video.
    clip = mp.VideoFileClip(imgfile).subclip()
    clip.write_videofile(outfile, audio='audio.mp3')

# 動画のファイル名 設定
srcfile = sys.argv[1]
imgfile = "out.mp4"
outfile = sys.argv[1].replace(".mp4","out.mp4").replace(".MP4","out.MP4")
video = cv2.VideoCapture(srcfile)

# 幅と高さを取得
width = int(video.get(cv2.CAP_PROP_FRAME_WIDTH))
height = int(video.get(cv2.CAP_PROP_FRAME_HEIGHT))
size  = (width, height)

# 総フレーム数/フレームレートを取得
frame_count = int(video.get(cv2.CAP_PROP_FRAME_COUNT))
frame_rate = int(video.get(cv2.CAP_PROP_FPS))

# 保存用
fmt = cv2.VideoWriter_fourcc('m', 'p', '4', 'v')
writer = cv2.VideoWriter(imgfile, fmt, frame_rate, size)

for i in range(frame_count):
    ret, frame = video.read()
    write_frame = mkimg(frame)
    writer.write(write_frame)

    cv2.imshow("newf", write_frame)

    # qキーが押されたら途中終了
    if cv2.waitKey(25) & 0xFF == ord('q'):
        break

writer.release()
video.release()
cv2.destroyAllWindows()

# 最後に音をつける
set_audio(srcfile,imgfile,outfile)


コメント